Category Archives: kiddo

Scrap Wood Blocks Part 1

I did end up getting to most of my Christmas gift projects from my queue this year, but sometimes you need to admit defeat. I wanted to make little man a set of blocks from the scrap wood we had left over after building the chicken coop. I did pretty well. Cut out the pieces and sanded…oh about 8 of them. I managed to get some of them done while he and I were playing outside but the weather has been so rainy that there hasn’t been much outside playtime recently. So the blocks will have to wait for his birthday. Or maybe he’ll get to have them before his birthday if I finish them months ahead of time and don’t want to wait to give them to him (more likely scenario).

Here he was “helping” me trace out the shapes for his blocks on the larger pieces of wood.

There he is! Peek a boo!

Do you ever have to admit defeat on well-intentioned projects? Or at least postpone them for another time. I sure hope I’m not the only one!

Felt Farm Animals

I’m finally declaring myself finished with my Christmas present queue. (At least until after Christmas, when I have a few that I need to retroactively complete).  I thought I was done last week, until yesterday when I decided that little man *had* to have some farm animals to go in his toy barn. He’s been playing with the barn for a while (I bought it at a garage sale and used it with my preschoolers when I was working), but with no farm animals to go inside, it was definitely lonely. One time, I got all the farm animal blocks in his Uncle Goose block set and put them inside, but it didn’t really feel right. it needed “real” animals. I had visions of putting his barn under the Christmas tree and having him discover new animals inside. But it was already December 22nd. I figured I should just give up the Christmas morning idea and make them later on. I even considered going out and buying some farm animals but I couldn’t do it. And I’m stubborn.

So I found some patterns for stuffed farm animals. The pig, hen and lamb come from Martha Stewart, and the horse I found through some mad google searching skills. I hate to look a gift horse in the mouth (since all the patterns were free), but Martha’s directions were really terrible. I guess I’ve been spoiled by crafty bloggers who do awesome tutorials with step by step directions. Anyway, there were some frustrating moments, but if there’s one thing I’ve gotten better at through sewing and knitting, it’s patience. So I powered through, figured it out and finished. By the time I got to the horse (which has no directions at all), it was easy and I finished it in about 45 minutes. They’re not perfect, but I doubt he will care. I can’t wait for him to open his present!

The hen has a bean bag sewed to the bottom so that she doesn’t tip over. It also makes it very easy to have her peck a the ground. 
Here’s the gang. Soon I hope to add a black cat, a cow, a chick, a duck, a goose….*sigh*
There’s a pipe cleaner in Mr. Pig’s tail to keep it curled.
I couldn’t get him to stand straight up, so he’s a jumping horse.

So to those of you who celebrate Christmas, happy day before Christmas Eve! I don’t know if I’ll post again before the actual day so Merry Christmas!

Knit Santa Hat with FREE Pattern

Last Saturday was small business Saturday and Amex was running this pretty sweet promotion where if you signed up and spent $25 at a small business, they would give you a $25 credit. I immediately thought, “free yarn!” Yipee!! On top of that, my local yarn store had a “make your own sale” that day. Basically, you got to pick a poker chip out of a pot and get the equivalent discount off your purchase (including clearance items). So I set out to the yarn store with a list of yarn I needed to make this cardigan I’ve had my eye on for ages. I did end up finding the yarn I needed for that project (which I wont start until after Christmas), but I also wound up checking out the clearance bin and found some super soft red and white Alpaca and Merino blend yarn. It was a steal with both discounts, so I decided I’d make little man a Santa hat with it.
I looked around on Ravelry for a pattern I liked but didn’t really find anything just right in his size. So, for the first time ever, I went rogue and made my own knitting pattern. I based my decreases off of this hat pattern from 
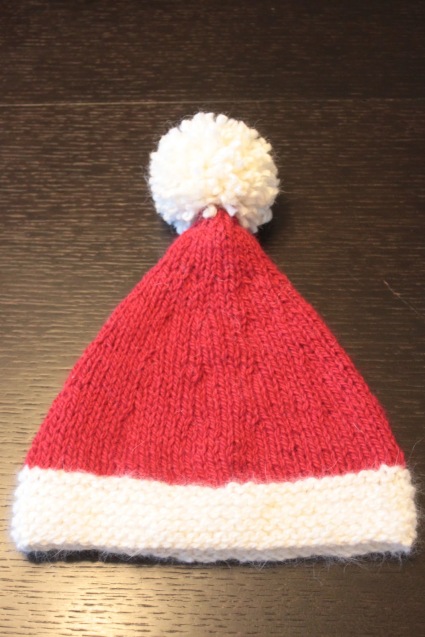
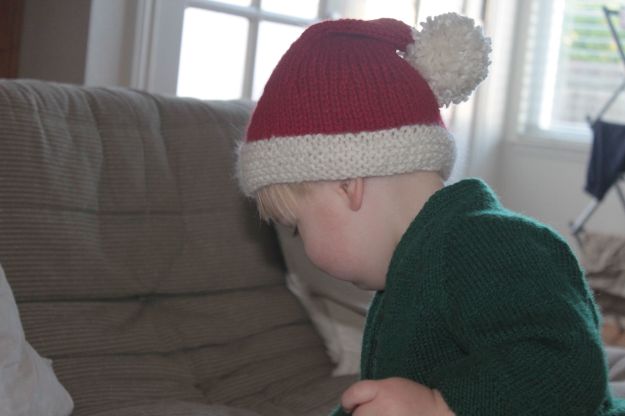
Apartment Full of Fur, Fuss, and Fiber because she also started off with 60 stitches, but I adjusted the number of rows in between decreases. Here’s how it turned out:
In case anybody out there needs a Santa hat pattern that will fit a toddler (18-24 months…maybe beyond that given how stretchy it is), I’m posting the pattern here for you to use and enjoy too. Please bear with me if there are differences from how patterns are normally written. I’m new to this, and also just learning how to read patterns in English (I have always used French patterns until recently).
Toddler Santa Hat (18-24 mo)
Yarn: Aran weight. Approximately 110 yards MC (red) and 50 yards CC (white or ecru)
Recommended Yarn: Cascade Yarns “Cloud 9”
Gauge: 4 sts= 1 inch in stockinette
Needles: Size 9 US DPNs or 40″ (or longer) circular for “Magic Loop” method
CO 60 sts in CC. Place marker and join the round.
Stitch in garter stitch (Knit a round, purl a round)
Continue until 1.5 inches is reached
Switch to MC. Continue in stockinette until you reach 3.5 inches total
Begin decreases:
K4, K2tog, repeat around (50 sts remain)
K around for 6 rows
K3, K2tog, repeat around (40 sts remain)
K around for 6 rows
K2, K2tog, repeat around (30 sts remain)
K around for 4 rows
K1, K2tog, repeat around (20 sts remain)
K around for 6 rows
K2 tog around (10 sts remain)
K2tog 4 times, then K2

6 sts remain. Tie off by using a tapestry needle to thread through remaining sts. Attach pom pom.
IMG_3490

DIY Toddler Slippers

There’s nothing cozier to me than a pair of slippers when you’re home on a cool day. (Well, maybe a pair of slippers, good book and a fire would be even cozier, but you get the point).
Little man didn’t have any slippers, only socks. But most of his socks aren’t non-slip, so when wearing socks he’d just slip and slide around the house- falling even more than he normally would without any socks on. Something needed to be done so that he could have warm feet without all the falls. So, I set out to make him some slippers. I used some non-slip fabric that I found at Jo-Ann. I believe I spent $3 on enough of this stuff to make slippers for years to come (and I only bought 1/4 yard). For the rest of it, I used scraps of fleece and some 1/4 inch elastic that I already had. For the pattern, I adapted it from a pair of soft soled shoes that currently fit him. I was able to get these done start to finish (making the pattern and all) in a couple hours. Now I’m going to make him a few more pairs in different colors for when these ones are in the wash.
If there’s enough interest, I can do a tutorial for how to make these. Let me know in the comments if you’d like that.
Front and back
Slippers in action

Jacket adapted from the Urban Hoodie pattern by Heidi and Finn

So at this point you might be getting tired of seeing my creations sewn with the Heidi and Finn Urban Hoodie pattern (I swear, I don’t get paid to promote her pattern here). This time, though, I adapted it and made a jacket for little man.
Normally, the pattern should be made with knit fabric. I used woven fabric for this jacket, so I made it bigger because there’s no stretch in the fabric (size 5T instead of 2T). I also extended the bottom, since in the sweatshirt version, there’s normally a bottom panel of fabric that adds to the length. Here’s a picture to make it clear what I mean by bottom panel:
For the sleeves, I used a smaller seam allowance than the pattern recommends. I’ve found the sleeves on this pattern to be very tight, so I think I’ll be doing this for the sleeves from here on out when I use this pattern.
I also added pockets to the front. And finally, to make sure it’s nice and warm for the winter, I put cotton batting in between the main fabric and the lining.
Oh, one more thing- normally the neck curves up a bit. Can you see what I mean in the picture below?

I don’t really like that. It seems to get in the way and annoy little man, so I just cut it off and made it go straight across. Like in the picture below:
IMG_2310
So here is the finished jacket:

I love how it turned out! He gets lots of compliments on his jacket when we’re out and about running errands.

IMG_2344

Perfect for playing outside on a cool day.

DIY Fleece Sleep Sack

The weather has officially cooled down here (and by that I mean it’s in the 50s during the day and 40s at night). Little man has a nice and warm lined jersey and cotton batting sleep sack that we use for nighttime, but he needed an upgrade from his single layer jersey sleep sack for naps. Plus, he was definitely getting too tall for the size we had. I decided that a sleep sack looked easy enough to replicate and I didn’t really want to buy another one. So, I used one of the sleep sacks we had to make a pattern, extended the length and used some fleece I got from a freecycler. The only thing I had to buy was some zipper by the yard, which I found on Etsy (and later discovered I could get at a local fabric store without paying shipping…next time).

The zipper goes from top to bottom, unlike commercial sleep sacks, so I put a little tag of fabric over the zipper closure to keep little man from being able to mess with it and to avoid it irritating his skin.

It turned out great and for about $3.50 (the price of the zipper with shipping), definitely saved me money to make it myself. I have another yard of zipper, and I’m planning on making another sleep sack soon. If there’s enough interest, I’ll take pictures while I’m making the second one and post a tutorial.

Happy Halloween!

We had so much fun yesterday! It was crazy and thus I didn’t have time to write up a blog post, but it was totally worth the crazy. We started off with music class, then went straight to our downtown for toddler/preschooler trick or treating, then came home for lunch and a late nap. I made some Jack-O-Lantern soup for dinner and we had an early dinner followed by trick or treating on our street. Little man had so much fun. Initially he hated wearing his costume, but he quickly forgot about it and kept it on. He loved going up to knock on our neighbors’ doors, sign “please,” take a piece of candy and put it in his bag and then sign “thank you.” We loved chatting with and meeting neighbors. We bought our house over a year ago, but still hadn’t met everyone. Halloween gave us a great opportunity to knock on peoples’ doors and chat with them.
About the costume- The pattern I used was Butterick 6695. He was supposed to be a tiger, but the only fabric I could find was this half tiger-half leopard print. Whatever. We went with it. Besides, if he had truly been a tiger, I would have gotten even more comments from my local Giants fans like “Why isn’t he a panda instead of a tiger, huh?” How could I have known over a month ago when I sewed this that the Giants would end up winning the World Series against the Tigers?
Luckily for little man, the heat wave we had last week broke and we got some cool weather for Halloween. We would have had to figure something else out at the last minute if it had been in the 80s like last weekend.

I hope everyone had a happy and safe Halloween! Did you dress up? Did your kiddo dress up? Share or link your costume in the comments! I want to see 🙂

Jack-O-Lantern Treat Bag

This will be little man’s first Halloween trick or treating. And by trick or treating I mean we’re going to go to a few neighbors’ houses to say hello and show off his costume. He probably doesn’t *need* a special trick or treating bag for this Halloween, but I can’t help it. I’m addicted to making things for my little boy. Plus, he’s obsessed with pumpkins and jack-o-lanterns right now so I think he’ll love it.

I used the bag pattern in Butterick B6695. You can barely see the example bag in the link, but the little boy dressed as a dalmatian is holding it. It looks like that little guy’s bag is made out of fleece. I made this one out of flannel. I’m so happy with how it turned out! I think I’m going to have to make little man another non-Halloween bag, because he was really into carrying his new bag around the house to hold his treasures.

Are you ready for Halloween? What have you been creating for it?

Giants longies in action

I already posted about these longies, just over two weeks ago. My timing in making them was impeccable, no? Who wouldn’t want a pair of mama made longies to watch your team in the World Series?
Game 1, first inning. Sandoval’s first home run of the night.

I changed his outfit before dinner so that they’d be clean enough to wear for tonight’s game too. So far, they’re lucky longies!

KCWC Day 5- Urban hoodie revisited

I know I promised to have this post up yesterday, but this weekend ended up being seriously crazy. It was good busy, but busy all the same and I never got a chance to take pictures, upload them and sit down at the computer to write up a post.
This hoodie might look familiar to you. I made almost exactly the same one for little man when he was 6 months old and posted about it here.
Aside from the buttons and bigger size, it pretty much looks exactly the same. I know, I’m boring, but what can I say? I loved this sweatshirt, had extra lining fabric, and decided to make it again. This time around, I also used cotton quilting batting in between the lining and main fabric to make it a bit warmer for the winter. That was new to me. I pinned it onto the wrong side of the lining and then just sewed the rest as I normally would have. I really love how it turned out and already have a plan for my next project with this pattern. I want to adapt it into a jacket (no hood), make the sleeves a bit bigger (they always end up tight with this pattern), line with batting again.

This concludes my KCWC sewing. I petered out after Friday. The weekend was too nutty to continue. I had a lot of fun participating in this for the first time, and found some new super talented and creative bloggers to follow. If you’re interested, check out the flickr feed with all the photos of people’s kids clothes week challenge creations. Thanks to www.elsiemarley.com for hosting!