Category Archives: pasta

Chicken Meatballs with Fettuccine and Tomato Sauce


For Christmas this year, I got treated to a kitchen gadget I’ve had my eye on for ages, but never pulled the trigger on….because I mean, who really needs a meat grinder? I would say this definitely falls on the “want” side of the spectrum rather than the “need,” but it’s still really cool! Plus, as we are seeing more and more news stories about food-born illnesses, my already crunchy-green-locavore-sustainable self is becoming even more cautious about where my food comes from. Especially meat. Even more especially ground meat. I always have to wonder what all is included in ground meat, and what bacteria might be lurking in there. My solution for the past few years has been to purchase my meat from local sources of grassfed beef. For a while, we were able to purchase beef from our CSA. At the time, we were using Eating with the Seasons. They had a deal with Paicines Ranch in Hollister and would deliver the beef in a cooler along with our veggies. This worked pretty well for us, but I found the quality and variety of veggies to be lacking, so we switched to our current CSA- Two Small Farms. They don’t offer meat delivery, but we’ve been very pleased with their veggies, so we’re sticking with them! Next season, starting in March, they are splitting back to their two original farms- Marquita Farms and High Ground Organics. I’m sure we wont be disappointed! Anyway, back to the meat. After Paicines Ranch, we started buying most of our beef from Prather Ranch, available at the Campbell Farmer’s Market, supplementing with grassfed beef from Whole Foods. The meat grinder doesn’t change where we will buy our meat from, but I may start buying more whole cuts of meat and grinding them myself. Even Whole Foods is not perfect and grinding the meat myself helps me to know exactly what went into my hamburger.

As far as chicken goes, Prather Ranch has whole roasting chickens, in season, although they often run out before I get to the farmer’s market. Mostly, we get Rosie Organic Chicken from Petaluma Poultry (through Whole Foods). That’s what we bought yesterday to try out my grinder! My new toy was super easy to use, and Trevor even said it was easy to clean. I think I see homemade bolognese in our future. Below, I’ve posted my recipe for the tomato sauce and for the chicken meatballs. Obviously, you can purchase already ground chicken for this recipe and they will turn out just fine. So if you don’t have a meat grinder, don’t fret…try it out!
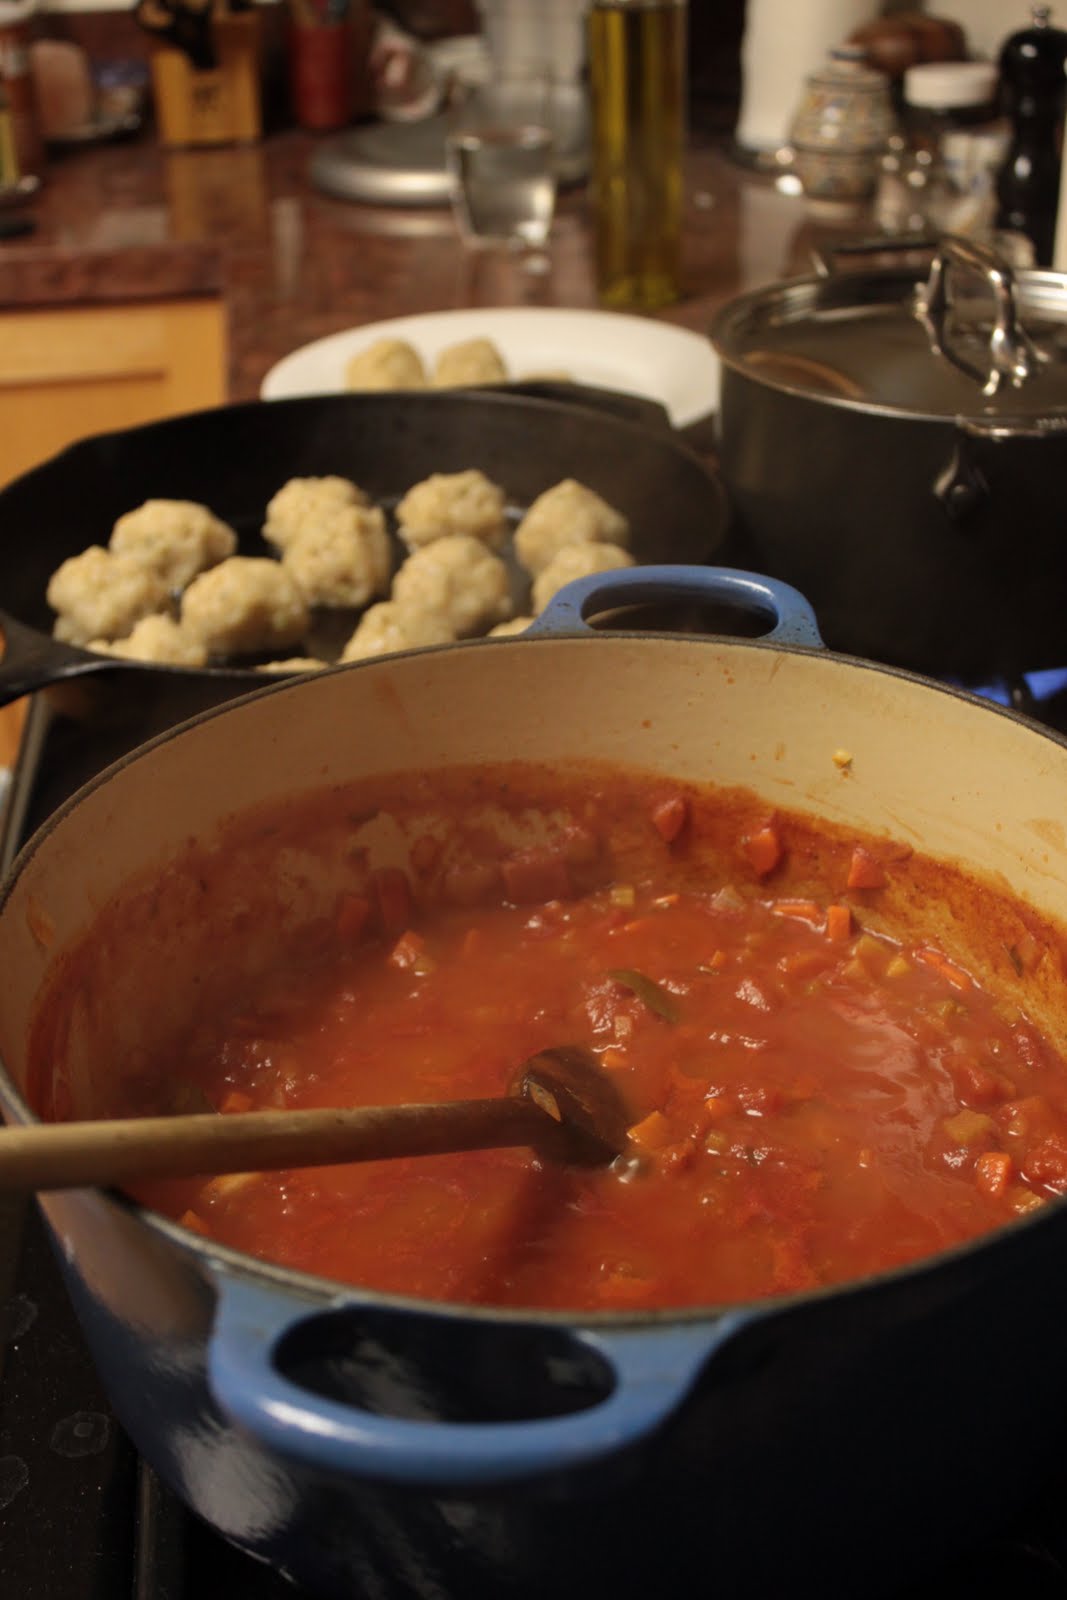
Tomato Sauce:
Ingredients:

  • Olive oil
  • 1 medium onion, chopped
  • 2 carrots, peeled and finely chopped
  • 2 celery stalks, peeled and finely chopped
  • 1 can tomato sauce
  • 2 cans diced tomato sauce
  • 2-3 Tbsp tomato paste
  • 3 bay leaves
  • dried oregano to taste
  • dried thyme to taste
  • salt to taste

Instructions:

  1. Heat a heavy-bottom saucepan over medium heat. Add enough olive oil to lightly coat the bottom of the pot and then add the onion.
  2. Once the onions begin to become translucent, add celery and carrots. Cook until they begin to soften.
  3. Add tomato sauce, diced tomatoes and tomato paste. Bring to a simmer.
  4. Add spices. Allow to simmer for about 40 minutes, until the vegetables are soft. Before serving, remove bay leaves. Season with salt just before serving.

Chicken Meatballs:
Ingredients:

  • 1 medium onion, cut into about 12 pieces.
  • 2 very cold chicken breasts, fat removed and cut into 1-inch cubes.
  • 5 Tbsp whole wheat bread crumbs
  • 1 egg
  • 1 Tbsp dried oregano
  • 1-2 tsp dried thyme
  • 2 tsp garlic powder
  • 1-2 tsp kosher salt
  • Olive oil for cooking

Instructions:

  1. If using a meat grinder- set up grinder, turn Kitchen Aid to speed 4 and begin feeding pieces of chicken and onion. Use the provided plastic tool to push chicken down for grinding. If not using grinder, put ground chicken in a bowl and chop onion as finely as you can. Mix onion and chicken with your hands.
  2. Add egg and mix into chicken.
  3. Add breadcrumbs, oregano, thyme, garlic powder and salt. Mix thoroughly with your hands.
  4. Form meatballs and place them on a plate as you go to keep them from sticking together.
  5. Heat a heavy-bottom pan (I used a cast iron pan) to medium and add enough olive oil to coat the bottom of the pan.
  6. Place the meatballs on the pan, allow to brown on one side and use kitchen tongs to turn them.
  7. Once the meatballs are browned on all sides they are ready to serve. Remove from pan and serve with tomato sauce and pasta. Enjoy!


Brussel Sprout Chanterelle Pasta with Brown Butter


Okay okay, I realize how ridiculously long it has been since I wrote a new post. I apologize. I’m actually touched by all the nudges I’ve gotten from friends to update the blog. Makes me feel warm and fuzzy inside.

Before we get to the good stuff (the food, obviously) I should fill you in on recent exciting developments in my grad school/career as an SLP. First, I’ve officially graduated with my Masters Degree in Speech-Language Pathology. It has actually felt a little anticlimactic since I walked in the graduation ceremony in June, finished my student teaching in December, and had my degree post to the university website about a week ago. It seems like such a momentous accomplishment should be accompanied by more than a link on a website, but at this point, I’m just happy to be done.

The other good news is that I have a job! I’ll be working as an SLP for a preschool for children with special needs- the same place where I did my student teaching. I’m thrilled about this, because I already know that the people and children at the school are wonderful. I know it will be a great experience! I get to start the job as soon as a little piece of paper (actually, an email) comes through- my credential. So until then, I’ve been trying to get things organized, start getting back in shape and simply enjoy the rest of my time off.

Alright, now on to the food porn. This dish was introduced to me by my supervisor at the aforementioned preschool. I believe she found the recipe in San Francisco magazine. It is simple and delicious…simply delicious! A huge part of what makes this dish so tasty is how fresh it is, so make sure your ingredients are at their peak of freshness. Especially the brussel sprouts- try to get them on the stalk; I promise you they will be better this way.

Ingredients:

  • 4 Tbsp. unsalted butter
  • 2 Tbsp. shallots, minced
  • 6 fresh sage leaves, chopped
  • 1/2 lb chanterelle mushrooms, sliced (or substitute shitake)
  • 1 lb. brussel sprouts, thinly sliced
  • 10 oz. fresh tagliatelle or fettuccine pasta (I opted for fettuccine, but I bet tagliatelle would be delicious!)
  • Grated parmesan
  • Salt & pepper, to taste

Directions:

  1. Cook 2 Tbsp of butter over low-medium heat until it becomes light brown. Add the shallots and sage and cook until the shallots begin to soften (about 2 minutes). Turn the head up to medium. Add the mushrooms and brussel sprouts. Continue cooking until mushrooms and brussel sprouts start to soften (3-4 minutes). Turn heat off, and cover to keep warm.
  2. Cook the pasta in a large pot of boiling water. Reserve about 1/2 cup of the cooking water. Drain but do not rinse. The pasta should be very wet.
  3. Add the pasta to the pan with the brussel sprouts and mushrooms. Add the butter, parmesan and salt and pepper to taste. If the pasta seems dry, add the reserved 1/2 cup of cooking water. Serve immediately and enjoy!

Pesto Linguine with Green Beans


The end of summer is here, and for me this often means that I’m completely overloaded with basil from the garden and need to make pesto to freeze and/or eat right away. I wish that that were the case this summer, because I love having lots of pesto stored away all year round for those winter days when I really want a taste of summer, but basil costs $5.00 per sprig and is flown in from Chile. Unfortunately, my basil plant performance was substandard this year so I had to resort to buying basil to make my yearly stock of pesto. Better luck next year, I suppose!

The great thing about pesto is that it’s SUPER easy to make. On top of that it’s delicious, freezes really well, and you can do lots of other things with it besides putting it on pasta (like using it on a pizza instead of pizza sauce).

Here are the ingredients you’ll need to make enough pesto to freeze some and eat some right away:
4 c. packed basil leaves
1 c. pine nuts
1 c. shredded parmesan
1/2 c. olive oil
3 cloves garlic, peeled and whole
1 tsp salt

Wash and dry the basil leaves and throw them into your food processor (a blender would probably do the trick, although I’ve never tried). Add the pine nuts, parmesan, garlic, and salt. Turn on the food processor and slowly pour in the olive oil in a constant stream. Process until the pesto reaches the consistency you want. I like it pretty smooth, personally. You may have to scrape down the edges and process it again. You should get something looking like this:

If you’re going to freeze some, what I always do is put the pesto into an ice cube tray and set it in the freezer. Once it’s frozen, I take my pesto cubes out and transfer them to a freezer bag. Throughout the year, I’ll take out pesto cubes as I need them, put them in a small bowl in the refrigerator in the morning, and let them defrost until the evening. If I forget to defrost them, or don’t plan that far ahead, I’ll throw them in the microwave for 30 second increments. I prefer not to do this, though, because it melts the cheese before you can mix the pesto in with pasta and you end up with big globs of pesto rather than a nice even spread of it.

After you fill up one ice cube tray, you should have a nice-sized portion left over for tonight’s dinner. Since I had some green beans from our CSA, I decided to cook them up and toss them in with the pesto and linguine. The result was definitely tasty, and little lighter than it would have been with just pasta and pesto thrown in together. Other things you could toss in with your pasta include halved cherry tomatoes, lightly wilted spinach leaves (or arugula), or roasted bell peppers. And there you have another tasty summer dish!