So, once again, here I am having neglected fraises et tartines for far too long. However, this time I have something to show for the long absence…a Master’s degree! After three years of hard work and stress, the long-awaited day has finally come and gone- graduation! Last week I walked in the Communicative Disorders & Sciences graduation ceremony and felt the elation of having accomplished something big…and the relief of knowing that I will never have to take another test (…unless I go get a PhD some day, but that wont be for a long time!). I think I can speak for all of my fellow soon-to-be speech-language pathologists when I say, “TGIFO!” (or, “Thank god it’s finally over!”).
Anyway, my attention can finally turn back to some of life’s simple pleasures that I’ve been seriously missing these last few months & years…cooking, photographing, and writing about food, to name a few. I didn’t waste any time getting back into the kitchen after all of the graduation/family festivities died down. Two good friends were celebrating a birthday this week, so I took advantage of the opportunity to work on my cake-baking & decorating skills. I decided to go all out and make a 2-layer, 2-tiered cake covered in rolled fondant. The layers were strawberry cake with strawberry buttercream, and vanilla cake with vanilla frosting.
The process started by baking the 4 cakes…2 strawberry & 2 vanilla. For the strawberry layers, I used the Sprinkles Strawberry cupcake recipe that can be found on marthastewart.com. Both the batter & frosting have real strawberry puree in them, which gives them an authentically “strawberry” taste (especially the frosting). For the vanilla layers, I used the Magnolia Vanilla cupcake recipe that got rave reviews on RecipeZaar.com. I wont repost the recipes here, since they’re easily accessible on those websites, but I’ll do a step-by-step for actual cake-assembly.
Instructions:
1. Bake 4 round cakes (2 strawberry and 2 vanilla). I used 2 different round cake pans, one of them slightly smaller than the other, in order to get a tiered effect. What you’ll end up with is 2, 2-layered cakes. Once the cakes come out of the oven, let them cool on a wire rack before removing them from the cake pans (about 15 minutes). Then carefully remove them from their pans and allow them to cool completely on wire racks. I made the cakes a day ahead and let them cool overnight, just to be sure.
2. Use a very sharp, long, preferably serrated knife to even up the top of each cake. Try to make the cakes as flat and even as possible, since they will be sitting on top of one another. Next, using the strawberry buttercream, frost the top of the two bottom layers evenly. Then place the top layers on top for each cake. Like so:
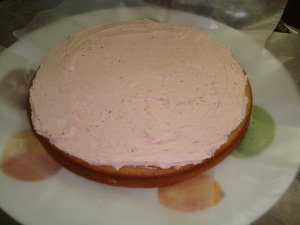

3. Next cover both cakes with frosting. I used vanilla frosting for the bottom cake, and strawberry for the top cake (although if I were going to make this again, I would cover both cakes in strawberry buttercream…it’s that good).
4. Once both cakes are covered with buttercream, it’s time to color your fondant. I kind of skipped over the whole, making the rolled fondant part of this. Just a quick recap, I made the fondant the night before as well, using a recipe for marshmallow fondant. It’s super easy to make and way cheaper/tastier than buying it at the store. However, if you don’t have time or don’t want to make your own fondant, you can find it at craft stores. I colored my fondant with a teal gel food coloring. I thought teal would fit well with the pool-themed party we were having for the birthday ladies. It takes a while to knead the color into the fondant and achieve a smooth color rather than marbling. Just keep kneading, and then refrigerate the fondant for about 15 minutes before using it to harden it up again.
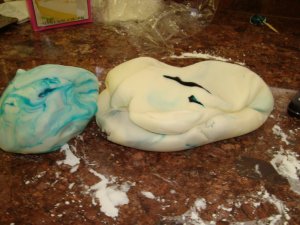
You don’t need much food coloring to achieve a deep color, so just add a little bit at a time. Also, this part can be very sticky. To avoid a sticky mess, cover the counter tops and your hands with corn starch.
5. Next, add more corn starch to the counters, your hands, and a rolling pin, and roll the fondant out to about 1/4-inch thickness. Make sure there’s enough corn starch on the counter top before you do this, or you might end up with a frustratingly lovely-looking, smooth, rolled out fondant that you can’t remove from the counter! (You guessed it, this happened to me several times).

You might think this is an awful lot of corn starch, but don’t worry. You’ll be able to wipe it off later with your hands, or a pastry brush.
6. Now you want to carefully lift the fondant over one of the frosted cakes, and smooth it onto the cake. You should have extra fondant around the bottom of the cake. Once the fondant is all smoothed out, use a pizza cutter to trim the extra fondant from the bottom of the cake. Repeat this with the other cake. Now you have two fondant-covered cakes!
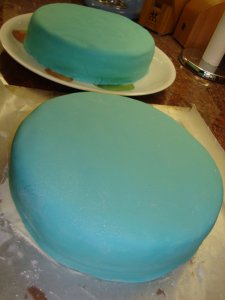
7. Next, carefully place the smaller cake on top of the larger cake, making sure it’s nicely centered. Don’t worry too much about imperfections in the cakes’ fondant edges, you’ll fix that later.
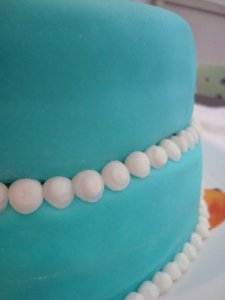
8. Using a thick vanilla buttercream, pipe small pearl-like dots around the bottom and middle circumferences of the cake. I used a buttercream from a recipe I got in a box of Wilton’s meringue powder. It’s extremely thick and holds well even in warm conditions. Unfortunately, it wasn’t very tasty, so I didn’t use much of it on the cake.

And here is a close-up of it for you:
9. Finally, roll out some white fondant and use letter-shaped fondant cutters to spell out “Happy Birthday!” Use a very small amount of water (I dipped my finger in water for this) to wet the back of each letter so that they will stick to the cake.
That’s it! You’re done! Now cut the cake and enjoy!