Category Archives: Bread

NYT No Knead Bread Recipe with Photo Tutorial

I absolutely adore this bread recipe. It was featured in a NY Times article back in 2006, which has probably received billions of hits by now. I still go back to this recipe often and change very little. Occasionally, I’ll add a bit of chopped up fresh rosemary or thyme, but really it’s so so good on its own.
Last weekend, we celebrated the impending arrival of my dear friend’s new baby. I asked how I could participate in the shower preparations and she asked me to make what she always asks me to make. Pesto and this bread. I decided to make two loaves for this party of 30 people and took pictures along the way to share the process with my readers.
I suggest you read through the whole process before starting. It takes about 20 hours start to finish, so I usually start it around 2-3 pm the day before I need the bread to be finished. I promise, this is quite easy to pull off. It just takes a lot of time and a little planning.


First, the ingredients:
– 3 cups of flour (all-purpose or bread. I prefer to use bread flour, for higher gluten content)
– 1 1/4 tsp salt
– 1/4 tsp yeast
– 1 5/8 cup room temp water (the water doesn’t need to be as warm as it usually needs to be for bread, since this dough will sit for 18 hours on the counter).

Directions:

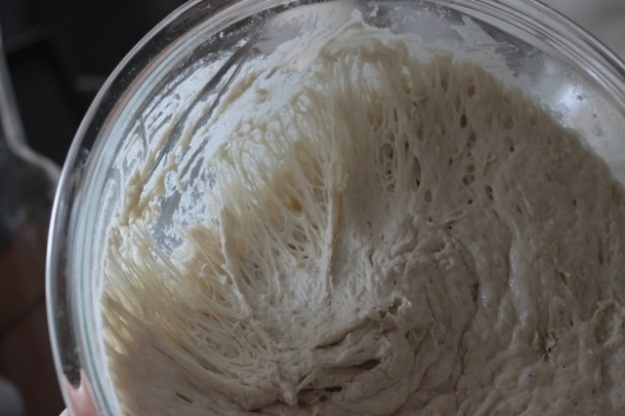
1. Mix the dry ingredients in a large bowl. Then add the water and mix it all up with a spatula or wooden spoon. I would usually use a kitchen aid for making bread, but not for this. It’s way too simple to justify washing the kitchen aid after. Just mix until the ingredients are well incorporated. It would be smooth. That’s fine, though. Now cover with plastic wrap and wait 18 hours. The original recipe says 12-18, but I really think 18 is best for full gluten development. After 18 hours, it looks like this. Kind of bubbly. No Knead Dough - 1

And here’s what it looks like when try to pull it off the sides of the bowl:

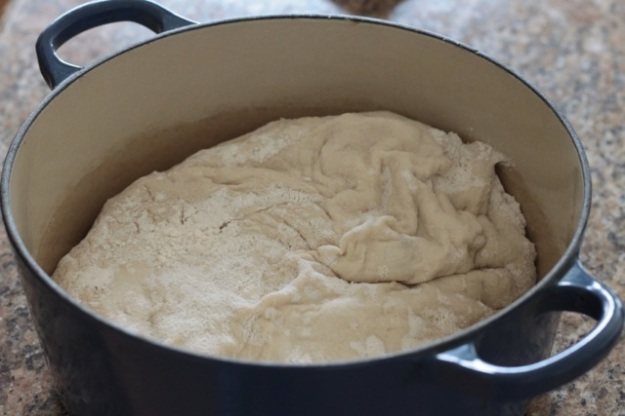
No knead dough - 2 2. Put some flour on your countertop and remove dough from the bowl onto the floured surface. I have to use a spatula to get the dough out of the bowl. It’s a sticky mess otherwise. Cover with the plastic wrap and allow to rest 10-15 minutes. No Knead Bread - 3 3. Now put plenty of flour (original recipe says cornmeal or flour. I prefer to use flour) on a clean kitchen towel and transfer the bread onto it. IMG_5237 Sprinkle more flour  on top of dough and cover with the kitchen towel. Let it rise for another 2 hours. IMG_5240 4. At least 30 minutes before the 2 hour rise is finished, put a cast iron dutch oven in your oven and preheat to 450 degrees F. The cast iron needs to be really hot to get a nice crust on your bread. When it’s time, carefully remove the dutch oven and gently flop the dough in. Quickly put the lid back on and put it back in the oven. (And don’t forget, the handle on the lid is very VERY hot!! I have made this mistake before and it wasn’t pretty. I suggest leaving your hot pad on the lid so you don’t forget). IMG_5241 IMG_5242 5. Bake for 30 minutes with the lid on. Remove the lid and bake for another 15 minutes, until the bread is nice and golden. Place on cooling racks and try to hold yourself back from cutting into it right away. Maybe go out and get yourself some nice cheese to eat with the bread. Or olive oil. Or pesto. Really, there are many good options here. Enjoy! IMG_5256

Rustic artisan bread made easy


And now for something completely different (i.e. un-paleo)- bread! I think when most people consider a no-grain diet/no-sugar, the thing that they think they could not live without is bread. And I agree that bread would be difficult to give up, especially as a French-American woman. However, at the risk of sounding snooty about French bread, it would be much easier for me to give it up while living in the US than while living in France. Here in California, I just cannot find bread that’s on par with the bread you can get at any boulangerie in France. I guess I’m just spoiled in the bread department. I’m told that things have vastly improved since my mom moved here almost 30 years ago, and I’m sure they have. Now you can actually find baguette, rustic loaves, and even pretty good imitation “Pain Poilane” at Trader Joe’s (called, “Pain Pascale”). For the most part though, the good bread can only be found at more expensive stores or bakeries. For example: the day after I returned from Paris, I decided to stop at the Santana Row bakery, Cocola, to pick up a baguette to have with all of the yummy cheeses I brought with me. The baguette that would have cost me 0.90 € cost $3.00. Even with a poor currency rate, this was over double the price of the French baguette. PLUS, it wasn’t good. Anyway, enough with the bready rant.

I have always been the type of person who tries to recreate things at home that would generally be left to the professionals (think, macarons). Bread is no exception. I’ve made many whole wheat sandwich loaves, but never thought it would be possible to make an artisan-type loaf without some serious research and time investment. Well the New York Times proved me wrong on this one. An article in November of 2006 featured a No-Knead bread recipe, adapted from a recipe used by Jim Lahey at Sullivan Street Bakery. I actually saw this article when it first came out, thought about trying it, and figured that this “no knead” phenomenon was probably too good to be true. So I never tried it out. I came upon it again in a William-Sonoma catalog and finally decided to take the plunge.

How can a loaf of bread be “No knead,” you ask? Well here is the short answer: Gluten development is one of the necessary components in making bread. There are 2 ways of developing gluten. The first is by kneading the heck out of the dough, and the second is by waiting a really long time for the gluten to develop on its own. Most bread recipes use a combination of the two, and this one simply chooses the second option.

Since the dough for this recipe must rest for 12-18 hours during the first rise, I suggest making it the night before. Basically, all this recipe requires is a little more planning than a kneaded loaf. I won’t repost the recipe here, since I really haven’t changed anything from the New York Times article. The only thing I would suggest, if you plan on serving the bread with a savory dish, is to add some chopped up fresh rosemary (or other fresh herbs) when you’re first mixing the dough. It gives the bread a nice flavor. Once you get a few successful loaves under your belt, try substituting some of the all-purpose flour with other types of flour such as whole wheat or rye.

Overall, I really must give a tip of the hat to Jim Lahey for sharing this amazing and incredibly simple recipe. My very first loaf came out perfect (a triumph I cannot claim for my other bread-making endeavors). He makes delicious bread accessible to anyone with a dutch oven and a little time, and for that, I say “Thank you!”


the makings of a tartine

Well I figured that given the name of this blog, I really should post something about making homemade bread early on. Good quality bread is the foundation of any mouthwatering tartine. I’m no Poilâne in the bread-making kitchen, but I’ve been experimenting for a while now, and have had enough successes and failures to feel fairly confident that I have something to contribute to a bread-making newbie.

Many people would probably wonder, why make your own bread when it’s so readily available, and relatively cheap, at the grocery store? Why go through all that hassle? The short answer is that it tastes better. If you’ve ever had homemade bread before, you know that none of the cellophane-wrapped breads that you find in a grocery store aisle can compete with it. Now, if I lived in France and could walk down to the local bakery for fresh bread every morning, this would be a different story. I would have absolutely no reason to make my own (other than for the fun of it). I don’t remember ever tasting a bad loaf of bread in France, but that’s because the French take their bread very seriously (almost as seriously as their cheese). The man I mentioned earlier, Mr. Lionel Poilâne took over his father’s baking business in the 70s, and was so successful that he became a sort of bread celebrity in France. His bread, known as “Pain Poilâne,” is equally well-known and coveted throughout France. Mr. Poilâne was so famous that when he died in a helicopter crash in 2002, it was all over the French news, and the country mourned his death. That’s how seriously we take our bread in France. Luckily, Pain Poilâne continues to live on, thanks to Poilâne’s daughter, a Harvard grad, who has taken over the family business. No, my bread will probably never reach the level of Poilâne’s but, it’s worth a try.

Other than taste, my reasons for making my own bread are:
  1. I’m all about making things from scratch, so why not bread too?
  2. I like knowing what goes into my bread. When I started looking at labels and saw how many unpronounceable ingredients go into bread, I became a bit wary of it and started thinking about making my own. Bread really only needs a handful of ingredients, so I don’t know what all those other ones are doing there.
  3. I specifically want to avoid eating foods containing high fructose corn syrup, which is in almost any of the processed foods on our grocery store shelves these days. I wasn’t too surprised to see it in things like soda, fruit juice, and cereal bars, but was shocked to see it in my bread!!
  4. I can be creative with it, and add sunflower seeds, flax seeds, or different combinations of flours to see what works best. That’s fun for me.
  5. It’s true that bread is fairly cheap at the grocery store, but it really does save me money to make my own. Especially since I would be buying organic, whole wheat bread, which would probably require that I go to a health food store and spend more money. By making my own, I can use organic ingredients that will make many loaves of bread for a fraction of the cost of a comparable loaf at the store.
  6. I can control where my ingredients come from, and try to keep them as local as possible. The closest source of whole wheat flour I’ve found is Bob’s Red Mill brand, which is based in Oregon. I’m also working on joining a grain CSA based out of Davis, CA, but haven’t been able to coordinate that yet.

So now, onto the actual bread-making process. I recommend that you start by trying to make white bread until you get the hang of it, since this is much easier to pull off than wheat bread. The best explanation and recipe I have found for a basic loaf of white bread is from a post on The Simple Dollar. He has some great pictures on there of each step involved in the bread-making process. I used this recipe the first several times I made bread, and they all came out beautifully.

The tough part came when I decided to try making whole wheat bread. I tried just substituting some of the white flour for whole wheat flour, and each time, I ended up with a brick-like loaf of dense “bread.” It’s just hearty, right? No, it really wasn’t very tasty. I was ready to give up, when a friend of mine suggested that I try adding gluten flour to the bread. She said that our flour contains less gluten than it used to, because many people have gluten allergies these days, but that it’s a necessary component to a good loaf of bread. So I visited my neighborhood health food store, found the gluten, and voila! A miracle. The bread has turned out perfectly every time. Over several trials, I developed a recipe that I like, that makes great sandwich bread, and wonderful tartines.

Here is the recipe I’ve been using:
1 c. warm water (100-110 degrees F)
2 tbsp. honey
1 tsp. live active yeast
1/3 c. milk
1 tbsp. melted butter
1 tbsp. olive oil
1 tsp. salt
1 c. all-purpose white flour
2 c. whole-wheat flour
5 tbsp. + 1 tsp. gluten flour
1/2 c. sunflower seeds
I use my Kitchen Aid to mix and knead the bread, so I will write up the recipe with that in mind. However, you can make it just by mixing the dough with a wooden spoon, and then kneading it with your hands.
  • Warm the bowl you will be using by rinsing it with hot water. Add the first 7 ingredients to the bowl, and mix them a little so that they’re combined, and the salt, honey, and yeast are dissolved.
  • Add 1 c. of white flour, 1 c. of wheat flour and 3 tbsp. of gluten flour to the bowl. Using the paddle attachment, mix this on low speed for about 2 minutes.
  • Next add 1/4 c. of whole wheat flour, and mix for 1 minute.
  • Add another 1/4 c. of whole wheat flour, with 1 tbsp. of gluten flour, and mix for 1 minute. Do this two more times, adding whole wheat flour in 1/4 c. increments, with the last 1 tbsp + 1 tsp of gluten flour. Let the dough mix for 1 minute each time you add flour.
  • Switch to the dough hook attachment. Add 1/2 c. of sunflower seeds, and turn the mixer on low speed for 10 minutes.
  • Spray another large-ish bowl with canola spray, or olive oil spray. Remove the dough, form a nice ball with it, and put it in the newly sprayed bowl. Cover it with a clean kitchen towel, and set it aside to rise on the countertop. Here is where I made my mistakes when I first started making bread. The dough needs to rise in a warm place, but it does not need to be too warm. I used to put it in the oven on the “keep warm” setting. This turned out to be way too warm, and killed the yeast, giving me a brick. Just set it aside, and let it rise for 1 hour to 1-1/2 hours. Basically, until it doubles in size.
  • Spray a loaf pan with cooking spray. After the dough has risen, punch it down, and shape it into a long, flat rectangle. You don’t need to knead it much, just push it down a few times with your fists. This will do just find. Once it’s in a flat rectangle shape, roll it into a log, and place it, seam side down, in the loaf pan. Once again, cover it with the clean kitchen towel and let it rise for about an hour.
  • Preheat the oven to 400 degrees. Once your dough has risen, carefully put it in the hot oven. Bake for 28-30 minutes. I usually check it after about 25 minutes, and let it bake for another few minutes. 28 minutes seems to be the magic number in my oven, but will vary from oven to oven.
  • Take the bread out of the oven and immediately take it out of the pan. It should sound hollow when you tap the bread if it’s ready. Let it cool on a cooling rack.
  • Cut off a slice, and enjoy with your favorite tartine topping. My personal fav is a little butter with some honey drizzled on top. Delicious!