Category Archives: tomatoes

Summer tomatoes

Every time we head out to the backyard now, little man goes straight for the tomato plants. We had a slow start to our tomatoes this year since we were in France from mid-May to early June. Even though we weren’t able to plant them until we got home, I knew we’d eventually have some tomatoes to enjoy thanks to our long warm season.
Well, they’re not as impressive as last year, but we have definitely been enjoying lots of cherry tomatoes. Most of them have been eaten right off the plant. This is little man’s preferred method of tomato-consumption. In fact, there have been times when he’s eaten tomatoes voraciously while outside, only to flat out refuse the very same tomatoes in his high chair. I guess I officially have a toddler.
As long as the warm weather persists, I’ll at least be able to get him eating veggies on our trips out to the backyard. Next summer, he might even be know how to choose between green and red ripe tomatoes. What a wonderful way to learn your colors.
For now, we’re taking full advantage of our warm days while they last.
Get in my mouth!

Pesto and Heirloom Tomato Tarte

Finally a food post! It will be a quick one since I am about to head to bed, but that’s ok because this recipe is super easy and delicious. I made it while Q was napping, when my mom was coming over for lunch. Of course, by the time we were ready to eat, he had woken up and I ate the tarte one-armed with a fussy baby in the other arm. This did not, however, make the lunch any less tasty.

All you need is a frozen puff pastry dough, some pesto, 2 heirloom tomatoes and some parmesan cheese. Preheat oven to 400 degrees. Roll out the dough and press it into your buttered pan. Spread pesto on the bottom (I always keep ice cubes of pesto in my freezer for last minute pesto fixes…I think I used 3 cubes for this). Cut the tomatoes into thick slices and lay them in the tarte. Sprinkle with parmesan cheese and bake for 15 minutes. Then lower the oven temp to 350 and bake for another 10-15 minutes…until the puff pastry and parmesan are golden. Remove from the oven and allow to cool for 5 minutes or so. Serve and enjoy!

p.s. I apologize to all readers who do not live in California…I realize that a post about heirloom tomatoes right now is a little late for you. Really, I’m not trying to rub it in that we are still enjoying tomatoes here.

Chicken Meatballs with Fettuccine and Tomato Sauce


For Christmas this year, I got treated to a kitchen gadget I’ve had my eye on for ages, but never pulled the trigger on….because I mean, who really needs a meat grinder? I would say this definitely falls on the “want” side of the spectrum rather than the “need,” but it’s still really cool! Plus, as we are seeing more and more news stories about food-born illnesses, my already crunchy-green-locavore-sustainable self is becoming even more cautious about where my food comes from. Especially meat. Even more especially ground meat. I always have to wonder what all is included in ground meat, and what bacteria might be lurking in there. My solution for the past few years has been to purchase my meat from local sources of grassfed beef. For a while, we were able to purchase beef from our CSA. At the time, we were using Eating with the Seasons. They had a deal with Paicines Ranch in Hollister and would deliver the beef in a cooler along with our veggies. This worked pretty well for us, but I found the quality and variety of veggies to be lacking, so we switched to our current CSA- Two Small Farms. They don’t offer meat delivery, but we’ve been very pleased with their veggies, so we’re sticking with them! Next season, starting in March, they are splitting back to their two original farms- Marquita Farms and High Ground Organics. I’m sure we wont be disappointed! Anyway, back to the meat. After Paicines Ranch, we started buying most of our beef from Prather Ranch, available at the Campbell Farmer’s Market, supplementing with grassfed beef from Whole Foods. The meat grinder doesn’t change where we will buy our meat from, but I may start buying more whole cuts of meat and grinding them myself. Even Whole Foods is not perfect and grinding the meat myself helps me to know exactly what went into my hamburger.

As far as chicken goes, Prather Ranch has whole roasting chickens, in season, although they often run out before I get to the farmer’s market. Mostly, we get Rosie Organic Chicken from Petaluma Poultry (through Whole Foods). That’s what we bought yesterday to try out my grinder! My new toy was super easy to use, and Trevor even said it was easy to clean. I think I see homemade bolognese in our future. Below, I’ve posted my recipe for the tomato sauce and for the chicken meatballs. Obviously, you can purchase already ground chicken for this recipe and they will turn out just fine. So if you don’t have a meat grinder, don’t fret…try it out!

Tomato Sauce:
Ingredients:

  • Olive oil
  • 1 medium onion, chopped
  • 2 carrots, peeled and finely chopped
  • 2 celery stalks, peeled and finely chopped
  • 1 can tomato sauce
  • 2 cans diced tomato sauce
  • 2-3 Tbsp tomato paste
  • 3 bay leaves
  • dried oregano to taste
  • dried thyme to taste
  • salt to taste

Instructions:

  1. Heat a heavy-bottom saucepan over medium heat. Add enough olive oil to lightly coat the bottom of the pot and then add the onion.
  2. Once the onions begin to become translucent, add celery and carrots. Cook until they begin to soften.
  3. Add tomato sauce, diced tomatoes and tomato paste. Bring to a simmer.
  4. Add spices. Allow to simmer for about 40 minutes, until the vegetables are soft. Before serving, remove bay leaves. Season with salt just before serving.

Chicken Meatballs:
Ingredients:

  • 1 medium onion, cut into about 12 pieces.
  • 2 very cold chicken breasts, fat removed and cut into 1-inch cubes.
  • 5 Tbsp whole wheat bread crumbs
  • 1 egg
  • 1 Tbsp dried oregano
  • 1-2 tsp dried thyme
  • 2 tsp garlic powder
  • 1-2 tsp kosher salt
  • Olive oil for cooking

Instructions:

  1. If using a meat grinder- set up grinder, turn Kitchen Aid to speed 4 and begin feeding pieces of chicken and onion. Use the provided plastic tool to push chicken down for grinding. If not using grinder, put ground chicken in a bowl and chop onion as finely as you can. Mix onion and chicken with your hands.
  2. Add egg and mix into chicken.
  3. Add breadcrumbs, oregano, thyme, garlic powder and salt. Mix thoroughly with your hands.
  4. Form meatballs and place them on a plate as you go to keep them from sticking together.
  5. Heat a heavy-bottom pan (I used a cast iron pan) to medium and add enough olive oil to coat the bottom of the pan.
  6. Place the meatballs on the pan, allow to brown on one side and use kitchen tongs to turn them.
  7. Once the meatballs are browned on all sides they are ready to serve. Remove from pan and serve with tomato sauce and pasta. Enjoy!


Pesto, heirloom tomato, pepperoni & zucchini pizza

I think I pretty much gave the recipe away in the title of this post. Pretty basic pizza, but don’t let that boring word “basic” fool you. Sometimes the simplest meals are the best. You really can’t go wrong when you choose ingredients at the peak of seasonality, make your dough from scratch… oh and the pepperoni was from an artisan “charcutier” at the San Pedro Square Farmer’s Market in San Jose. I have to say, it was pretty delicious. For more specific “sub-recipes”…the dough recipe can be found here, and my pesto recipe is here. And the rest is pretty independently obvious. Have fun coming up with your own pizza creations!

And since this was such a short post, you get another pizza picture! Enjoy!

Garden Update- July 2010

I’m always a little apprehensive about venturing out to my patio garden after a long time away. We do have a drip system now (thanks to my wonderful, handy husband!) so the odds of my plants shriveling away have significantly decreased. But you never know when a hoard of aphids will attack poor unsuspecting tomato plants! When we got home Sunday night I took a quick peak outside and everything looked okay…better than okay, in fact. We had a bunch of new cherry tomatoes popping up and a new little eggplant! The eggplant…plant?…also has a bunch of flowers on it, so hopefully there’ll be more eggplants to come. I see eggplant parmigiana in my future!

This morning I snapped a few pictures of the tomatoes and eggplant to share:

Sweet 100 Tomatoes
Baby Eggplant

Sick gourmet?

Friday marked the end of my third week of my Student Teaching at a preschool for children with special needs. It has been a wonderful experience so far and, of course, the kiddos are absolutely adorable and mostly well-behaved. I’ve loved it so far. As I neared the end of week 3 and had not yet gotten sick, despite the dozens of children sneezing all over me, I thought I must have an immune system of steel. Friday morning I woke up feeling great, at 10am the runny nose started, by noon the soar throat was in full swing, and by Saturday morning I had a fever that lasted the rest of the day. Gosh these kiddo germs sure are strong!! Needless to say, I haven’t had the energy or appetite to cook much these last few days.
Friday night, I did muster up the energy to make a sausage, potato and cabbage soup that warmed me up and upped my vitamin C (from the cabbage). Saturday was leftover cabbage soup for lunch and pâtes au beurre (“pasta with butter”) for dinner. This morning, I’m starting to feel a little better, and suggested we have an omelet for breakfast. After all, we still have tons of veggies in our fridge that cannot be ignored!
Well my sweet sweet husband took charge (i.e. would not let me help with anything), and created an absolutely scrumptious omelet with cherry tomatoes, avocado, scallions, onion, turkey sausage and feta cheese. The sausage had a nice smokey taste and the feta was a perfect complement of flavors. The tomatoes were also a perfect addition. At this rate, I’ll be better in no time! Thank you sweet husband.

Tomates Farcies

Once again, I’ve let quite a bit of time go by without posting to fraises et tartines. I’m hoping this trend will change come January when I’m finished with my coursework for my master’s degree. I believe we only have about 8 weeks left in the semester, and I am definitely counting down. I can’t wait for the holidays, when I’ll have 5 weeks off to cook, bake, meet up with old friends, and just relax.

Aside from school, the most recent event around here was Trevor’s knee surgery a week and a half ago. About a month ago, he was doing a simple soccer drill, and he heard a pop in his knee and it gave out on him. He had an MRI and found out that he had a complete tear of his ACL. Not only that, but he had a tear in his meniscus and a loose body of cartilage floating around in his knee. We think that he probably already had a partial tear of his ACL from a previous injury, and the soccer drill just did him in. The surgery wasn’t scheduled until late October, but we got a call from the surgeon on a Tuesday saying that they had an opening for that Friday. So instead of letting Trevor limp around for an extra month, we jumped on the opening and he had the surgery early.

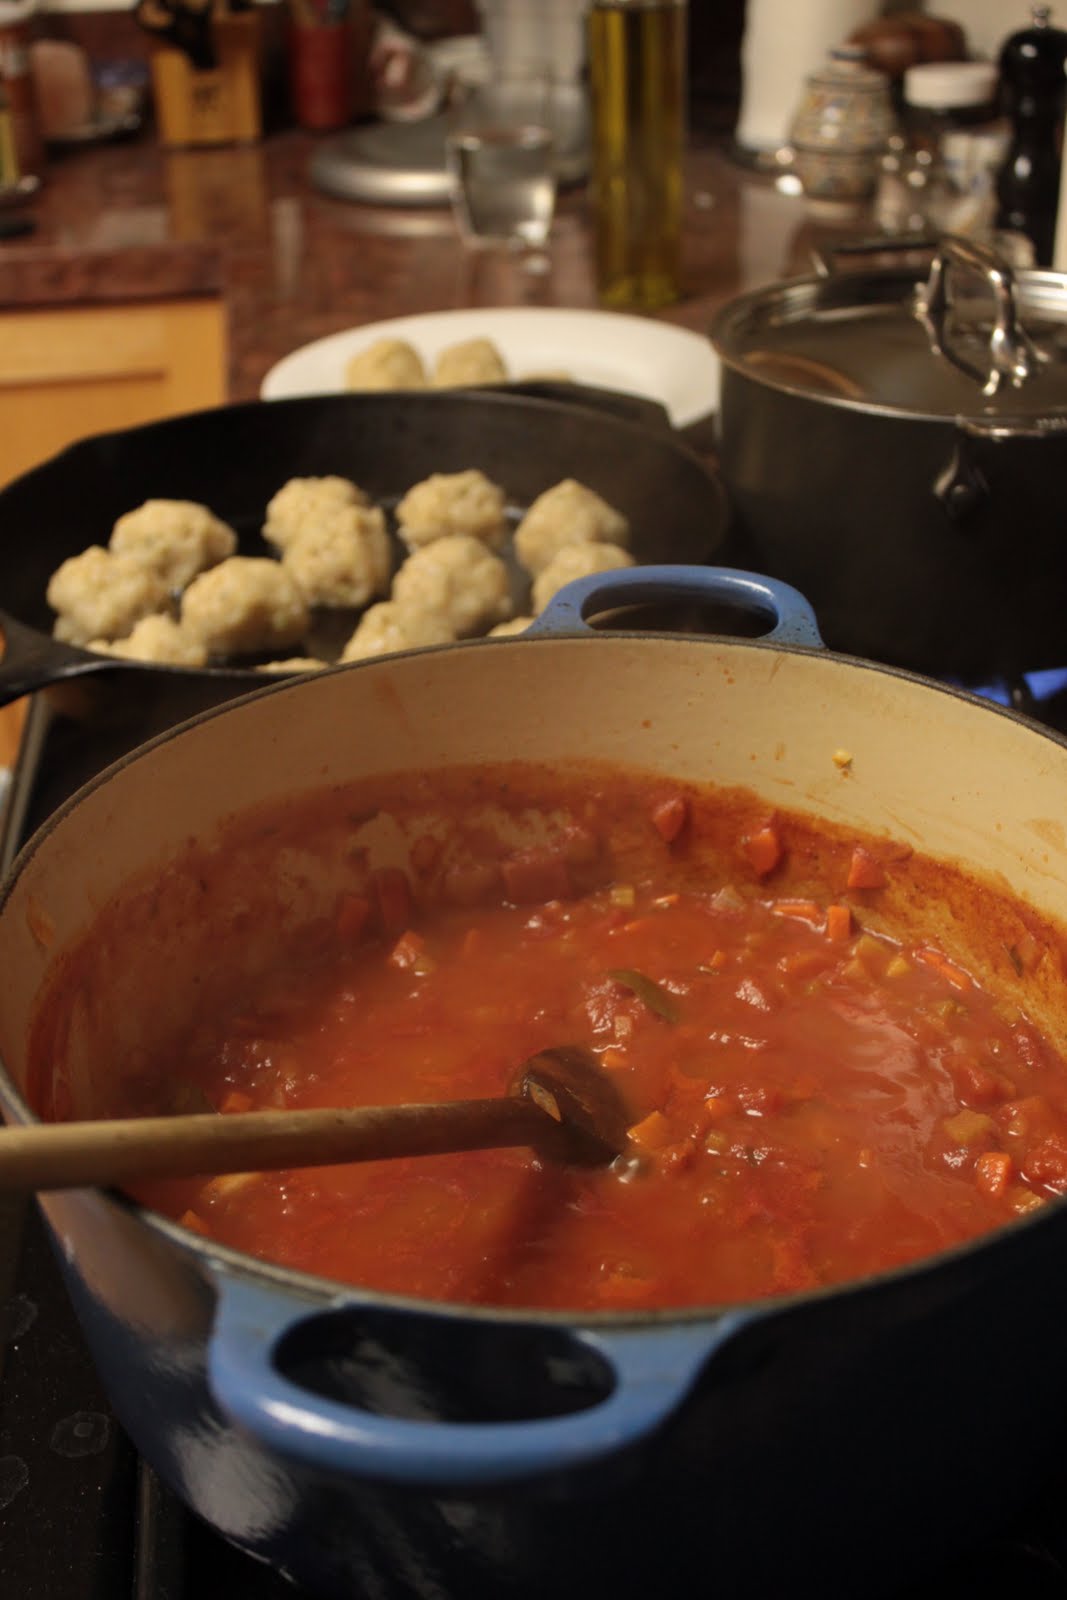
Being that I was already very stressed out about school at the time, the thought of having to take care of a post-surgery husband exacerbated the stress level for me and, by Tuesday night, I was a mess. And here is where the food-related part of my story comes in. Insert my mom. She’s an amazing cook and has a wonderful, generous heart. She offered to come over to my house on the day of the surgery and cook enough tomates farcies to freeze for many future meals. Not only did this greatly decrease my dinner-cooking time for many evenings, it relieved my anxiety about Trevor being in surgery. She managed to distract me from any worst-case scenario thoughts that may have crept into my mind during that day. Thank you, mom!

Trevor’s surgery was a success, by the way. He’s only 1 1/2 weeks out and he is already walking without crutches or a cane or anything. He still has a long road of rehab ahead of him before he’ll be able to run again, but he’s doing really well so far. His physical therapist was impressed, and his surgeon was happy with his handywork.

Now just to elicit jealousy of the delicious dinners we’ve been enjoying (and will continue to enjoy), I took pictures of the tomates farcies-making process.


They are delicious! Merci, maman! Tu es vraiment formidable.

Summer salsa with heirloom tomatoes and black beans

I’ve been reflecting on my past several posts recently, and I decided something. I need to incorporate some simpler recipes in fraises et tartines. I want this blog to be accessible to everyone without forcing my readers to be quite so “do it all yourself” as I am. This is just part of who I am. For as long as I can remember, I’ve dreamed of creating everything my family and I need totally from scratch. One of my favorite books when I was young was My Side of the Mountain, a story of a boy who runs away from home and lives off the land in the Appalachians. You can probably guess that I also really enjoyed Little House on the Prairie. I can still remember when my class made butter, as an adjunct project to that book. It opened up a new world for me (“You can make your own butter!? That’s awesome!!). I wondered what other common grocery store staples I could make from scratch. Anyway, I digress…I just wanted to describe where I’m coming from while still recognizing that not everyone is like this. Many people just want to make a simple, tasty and healthy dinner for themselves or their family in as short a time as possible. That’s why shows like “Rachel Ray’s 30 minute meals” are so popular. Many people don’t even want to do this, but force themselves to cook at home for health or financial reasons. So all this to say that I plan on including recipes of all ranges.

Now about this salsa. I recently started making salsa when friends come over because it’s super easy, quick, and a real crowd pleaser. The great thing about salsa is that you can adapt the recipe according to your taste and what you have at home. Here is what I used to turn my salsa
from this:to this: Well almost…the beans aren’t pictured in the first one, but you get the idea!

Here is the complete list of ingredients:
1 heirloom tomato
1/2 large bell pepper
1/2 red onion
1/2 c. black beans
1-3 hot peppers (the number of peppers you use depends on the hotness of the pepper you have, and your taste…if you have a habanero pepper you probably only want to use 1/2 of it, for example)
1 clove garlic
juice from 1 lime
salt to taste

Chop the tomato, bell pepper, onion, hot pepper and garlic into small chunks. Combine all of these ingredients except for the hot pepper in a bowl and stir in the black beans. Add the lime juice and salt. Then add small amounts of hot pepper at a time. Taste after each addition until you get your desired level of spice. Serve with your favorite tortilla chips and enjoy!

Oh, and by the way…this is also a local and seasonal recipe! All of the fresh ingredients (except maybe the lime) came from our farmer’s market, and the black beans came from Phipps Farm Store.

Herbed goat cheese and heirloom tomato salad

Remember those heirloom tomatoes I wrote about a few days ago? They completely lived up to their heirloom expectations- they were flavorful, fresh, and juicy. I used them on some homemade pizzas, in several batches of salsa, and in a delicious herbed goat cheese and tomato salad. I got the idea for the salad from my friend Jennifer who described a similar dish she ate at Chez Papa in San Francisco. I haven’t tried it myself, so I don’t know if my creation is similar to the dish from the restaurant, but it was extremely simple to make, and delicious. Even Trevor, who’s not the biggest tomato fan, was savoring each bite.

Here’s what you need:
2 medium-sized heirloom tomatoes
1/2 c. soft goat cheese
1 Tbsp. olive oil
2 Tbsp. fresh herbs, finely chopped (I used chives and basil)
a pinch of sea salt
Using a sharp knife, cut a thin slice from the bottom of each tomato, so that the finished product will have a flat surface to sit on. Carefully slice the tomatoes so that they can be stacked back up into tomato form. In a small bowl, mix the goat cheese, herbs and olive oil until the mixture is smooth. Spoon a thin layer of goat cheese mixture between each slice of tomato as you stack them back up. Serve with a drizzle of olive oil. Enjoy.